> ## Documentation Index
> Fetch the complete documentation index at: https://visaflo.ca/knowledge-base/llms.txt
> Use this file to discover all available pages before exploring further.
# Document Checklist Templates
> Decide once which documents your firm requests for each case type, write your own client instructions, and apply them automatically to every new case.
## What checklist templates do
A checklist template is your firm's standing answer to the question "which documents do we ask for on this kind of case?"
For every case type, VisaFlo ships a standard document list based on IRCC requirements and visa office instructions. A checklist template lets you adjust that list once, in **Settings**, instead of repeating the same edits on every new case:
* Turn off documents your firm never requests.
* Replace the standard guidance with your own client instructions.
* Add documents that are specific to your firm's process.
* Write instructions in the languages your clients actually read.
Two rules govern how the template reaches your clients:
* **Document selection applies to new cases only.** Cases that already exist keep the list they were created with, so a policy change never silently removes a document a client was already asked for.
* **Client instructions apply immediately, firm-wide.** Instructions are shared by every case type built on the same questionnaire, so a correction reaches open cases the moment you save it.
## Open the checklist editor
1. Go to **Settings**.
2. Select **Templates**, then open the **Checklist** tab.
3. Choose a case type from the left list, or search for it by name.
The left list is split into **Case Type** (the standard types VisaFlo provides) and **Custom Case Type** (types your firm created from an existing case). Each row shows how many documents that type requests and whether your firm has customized it.
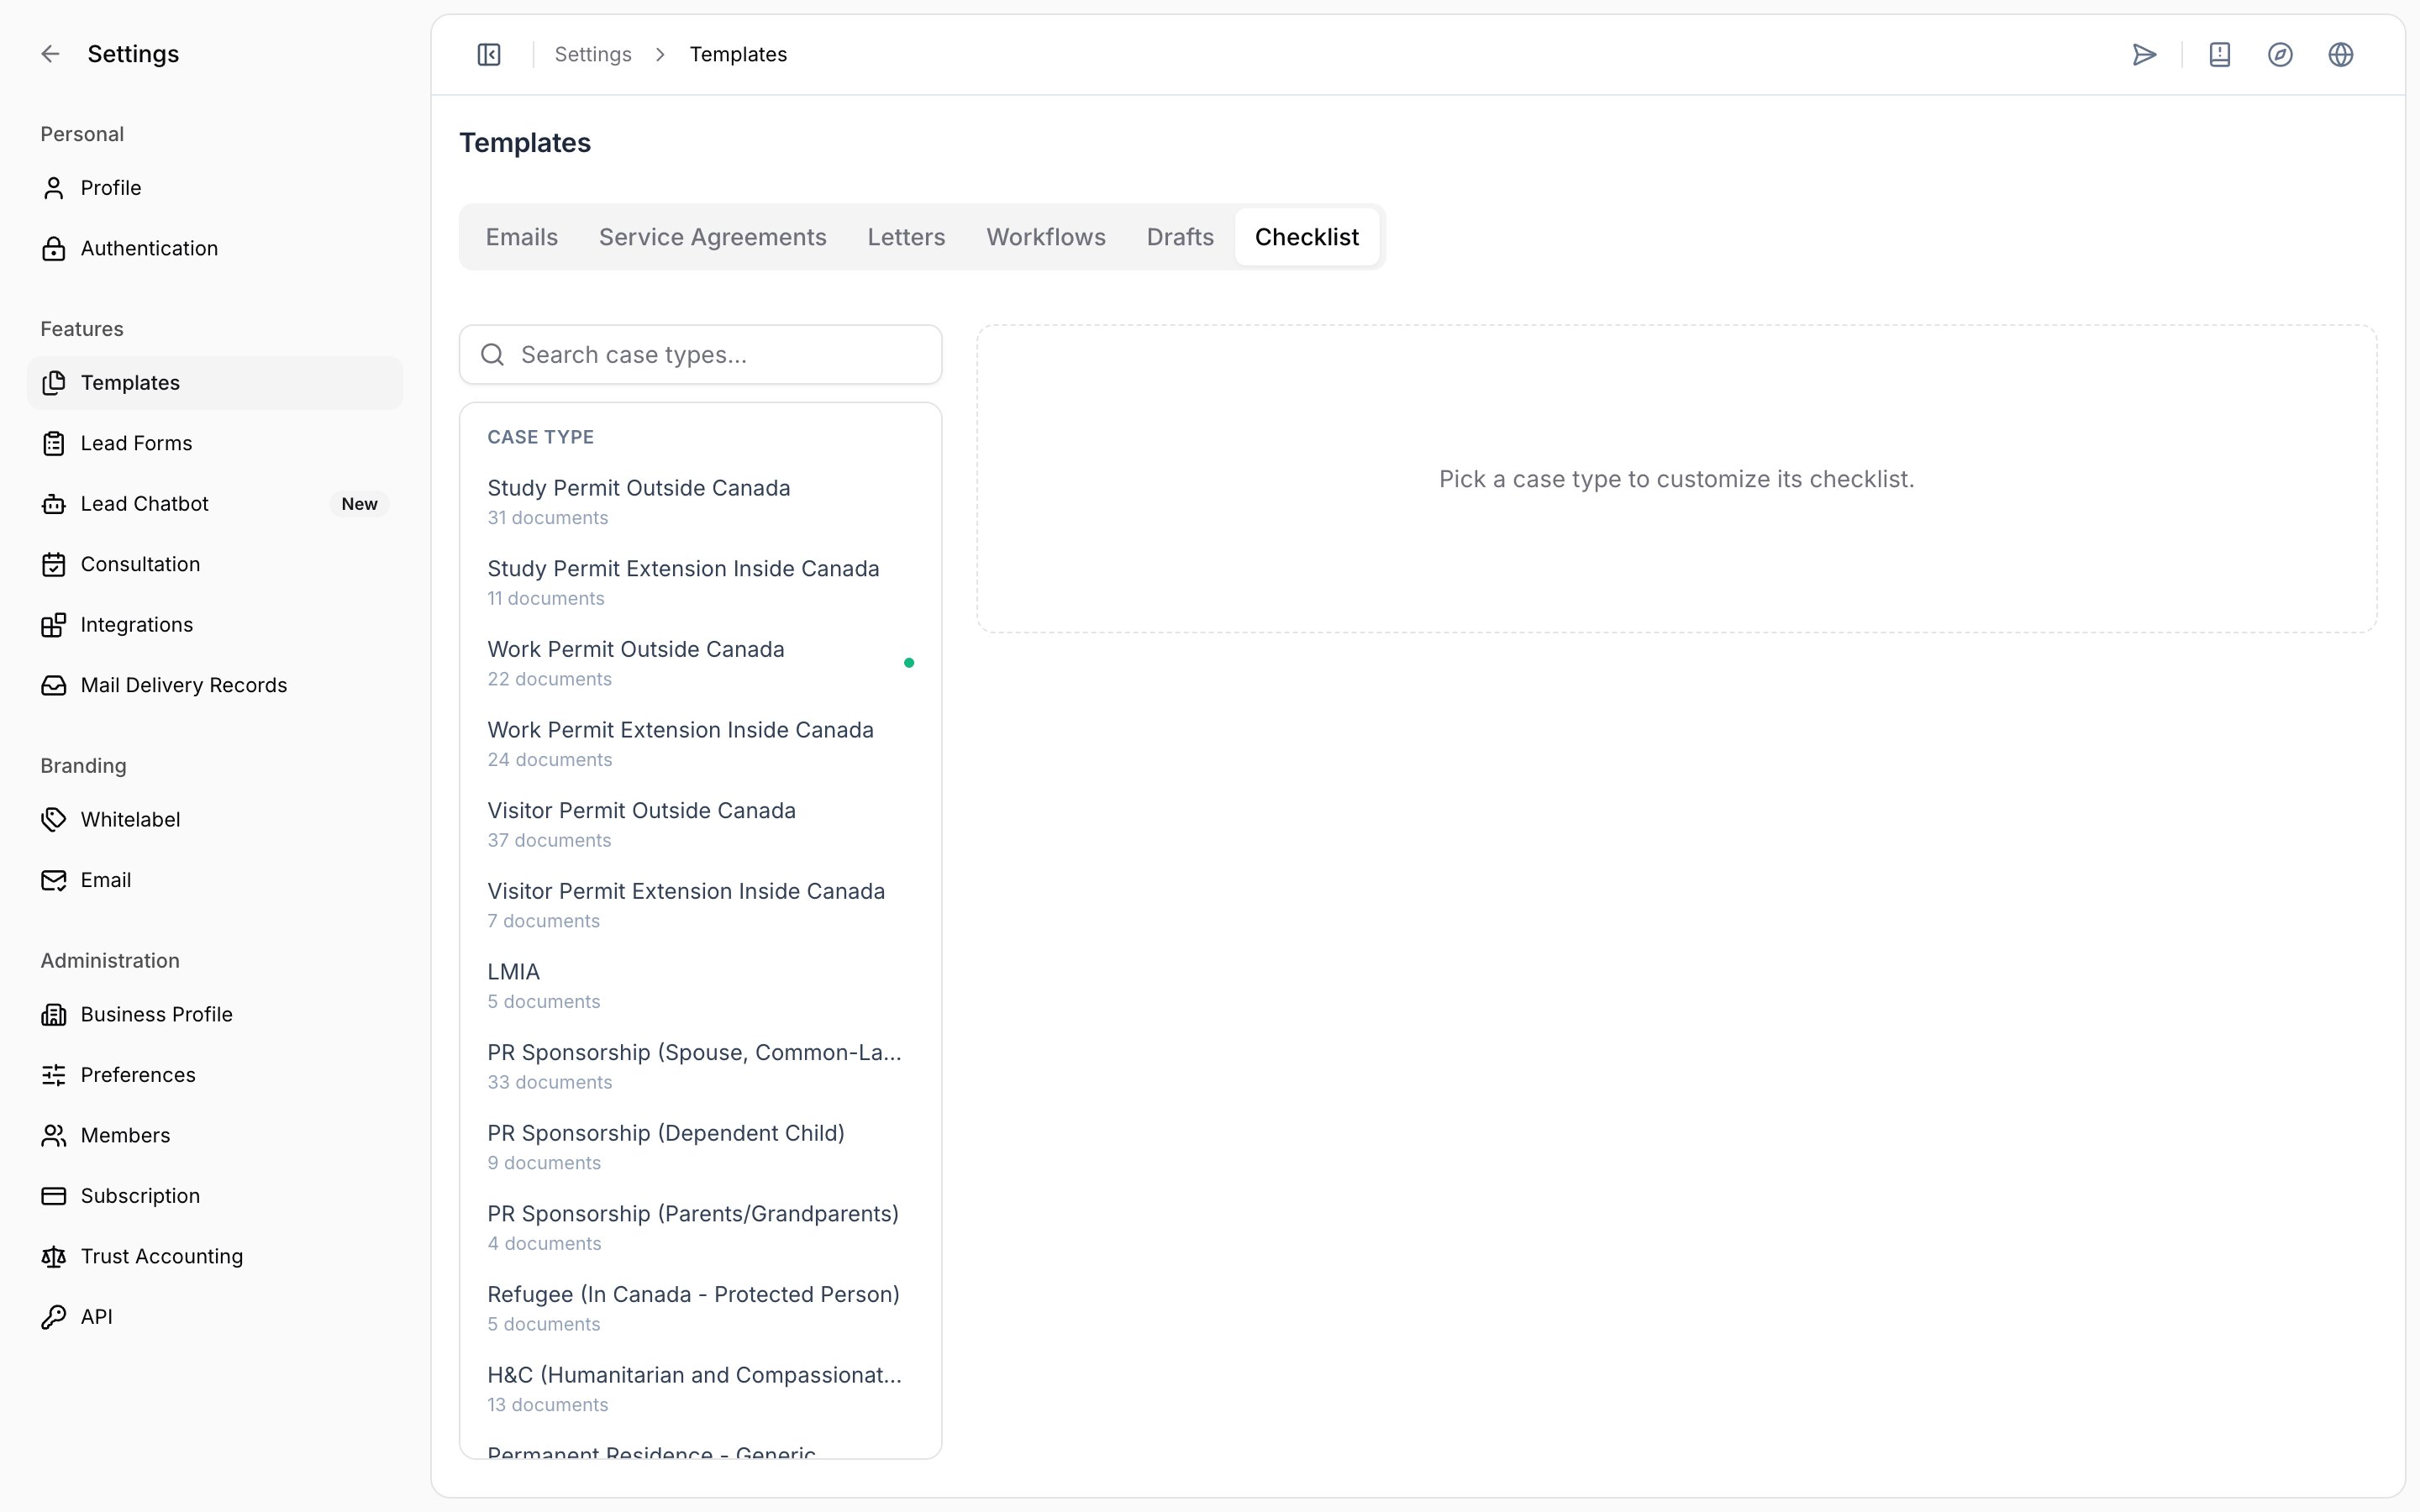 Settings, Templates, Checklist tab showing the case type list
## Read the document list
Documents are grouped the same way the client sees them.
* **Member sections** — for family case types, each role has its own section: *Principal applicant*, *Spouse / Sponsor*, and *Dependants*. Each section header shows how many of its documents are currently requested.
* **Upload groups** — grey bars such as *Applicant uploads*, *Relationship uploads*, or *Country specific uploads* group the documents beneath them.
* **Country-specific badge** — some documents are only requested from applicants processed by a particular visa office. Hover the badge to see which office and country it applies to.
Settings, Templates, Checklist tab showing the case type list
## Read the document list
Documents are grouped the same way the client sees them.
* **Member sections** — for family case types, each role has its own section: *Principal applicant*, *Spouse / Sponsor*, and *Dependants*. Each section header shows how many of its documents are currently requested.
* **Upload groups** — grey bars such as *Applicant uploads*, *Relationship uploads*, or *Country specific uploads* group the documents beneath them.
* **Country-specific badge** — some documents are only requested from applicants processed by a particular visa office. Hover the badge to see which office and country it applies to.
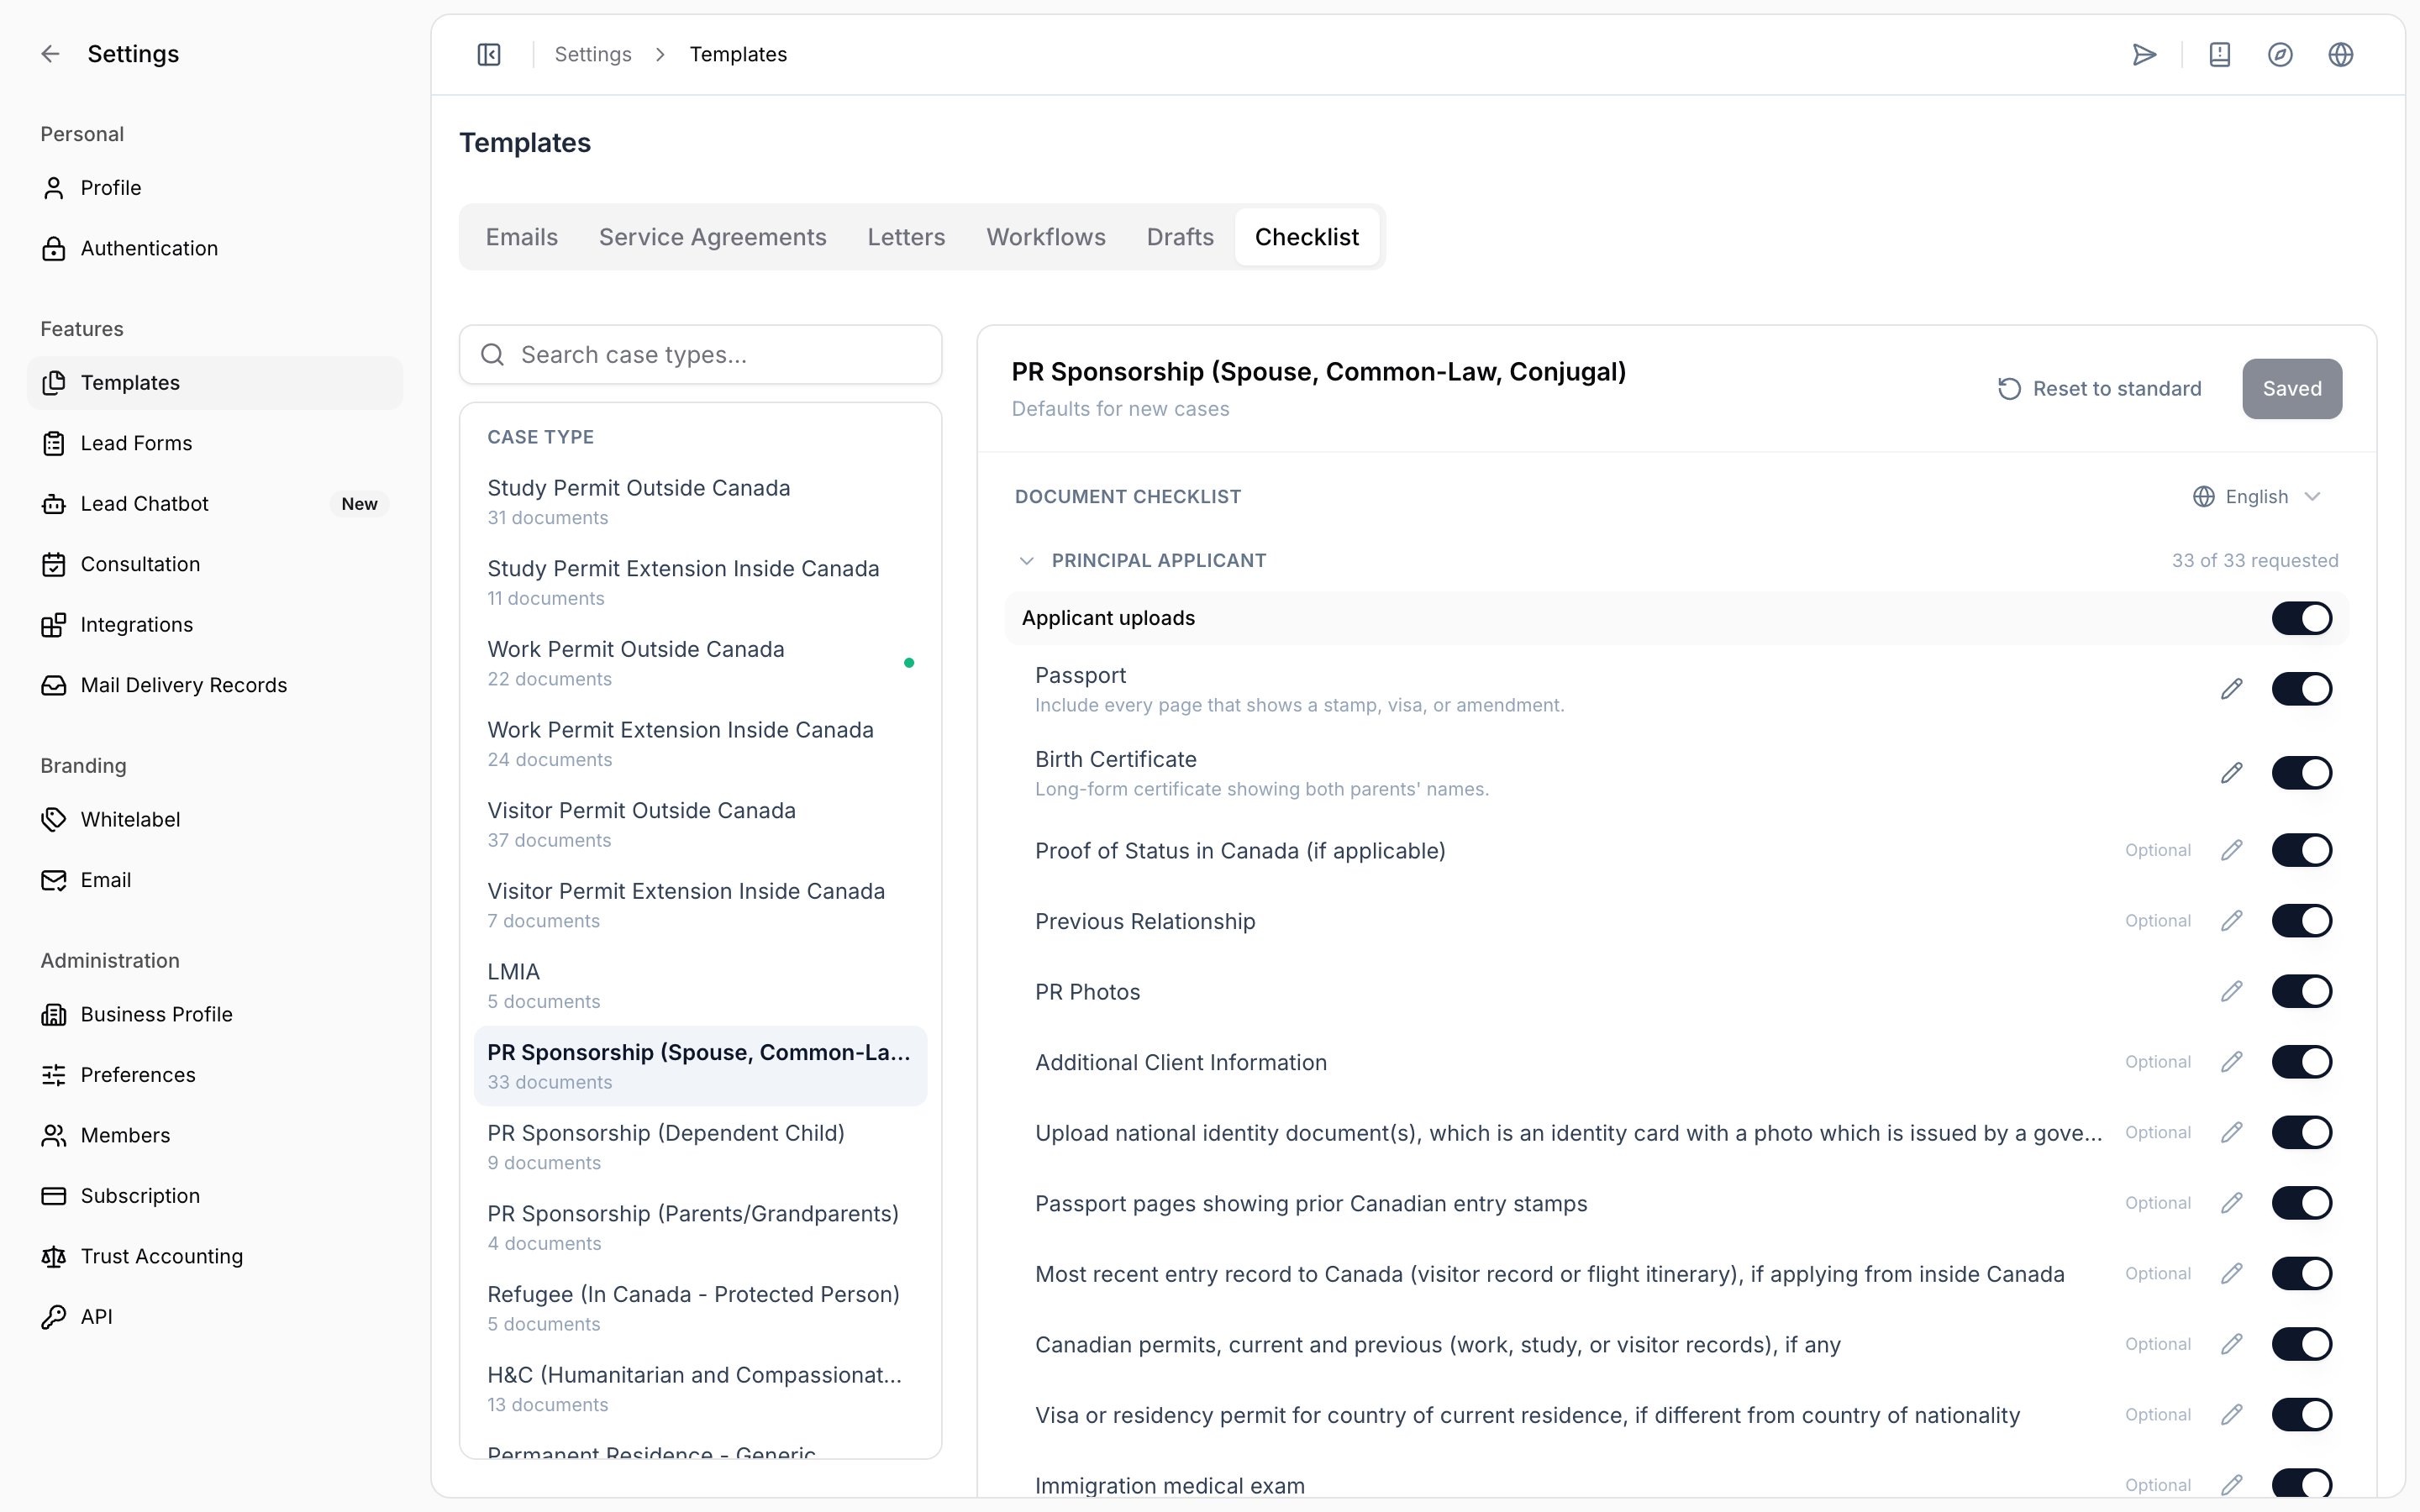 Checklist editor showing member sections, upload groups, and document rows
Each role keeps its own selection. Turning a document off for the principal applicant does not turn it off for the spouse or dependants, even when both roles request a document with the same name.
Checklist editor showing member sections, upload groups, and document rows
Each role keeps its own selection. Turning a document off for the principal applicant does not turn it off for the spouse or dependants, even when both roles request a document with the same name.
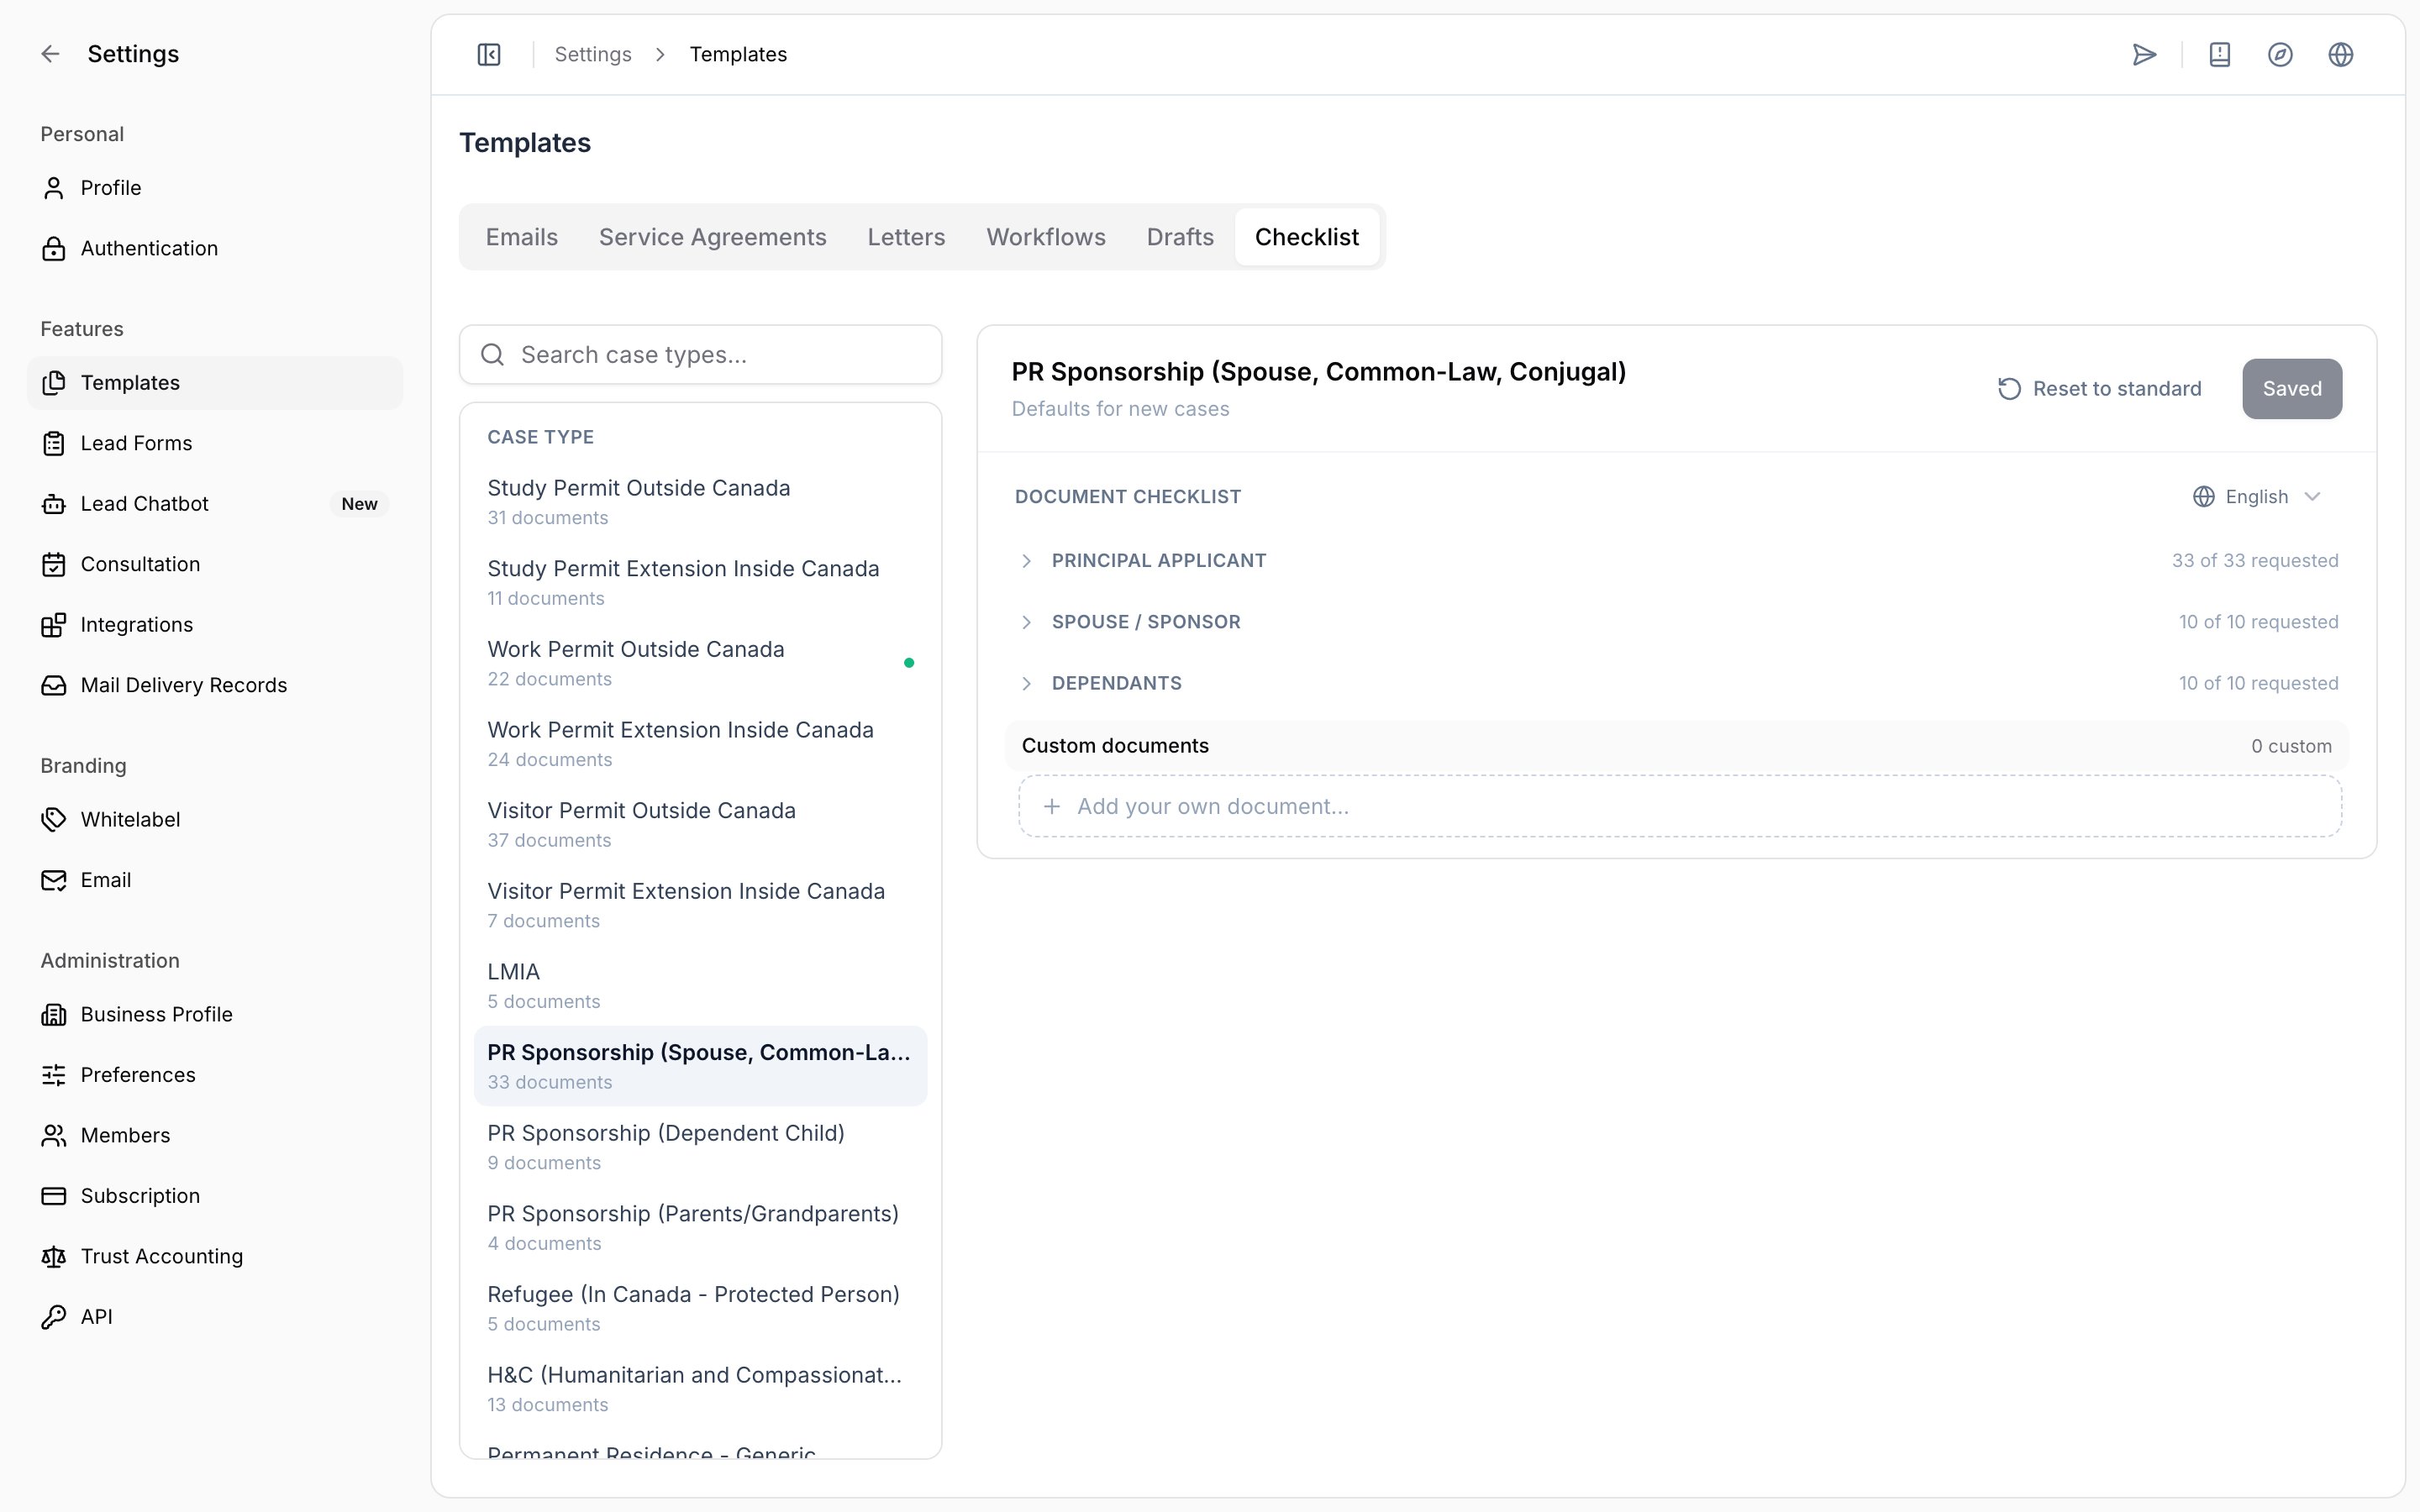 Member sections showing separate document counts for each role
## Stop requesting a document
1. Find the document, or the grey group header if you want to remove the whole group.
2. Switch it off. The row dims and the section count updates.
3. Select **Save changes**.
Turning a group header off disables every document inside it for that role only.
Member sections showing separate document counts for each role
## Stop requesting a document
1. Find the document, or the grey group header if you want to remove the whole group.
2. Switch it off. The row dims and the section count updates.
3. Select **Save changes**.
Turning a group header off disables every document inside it for that role only.
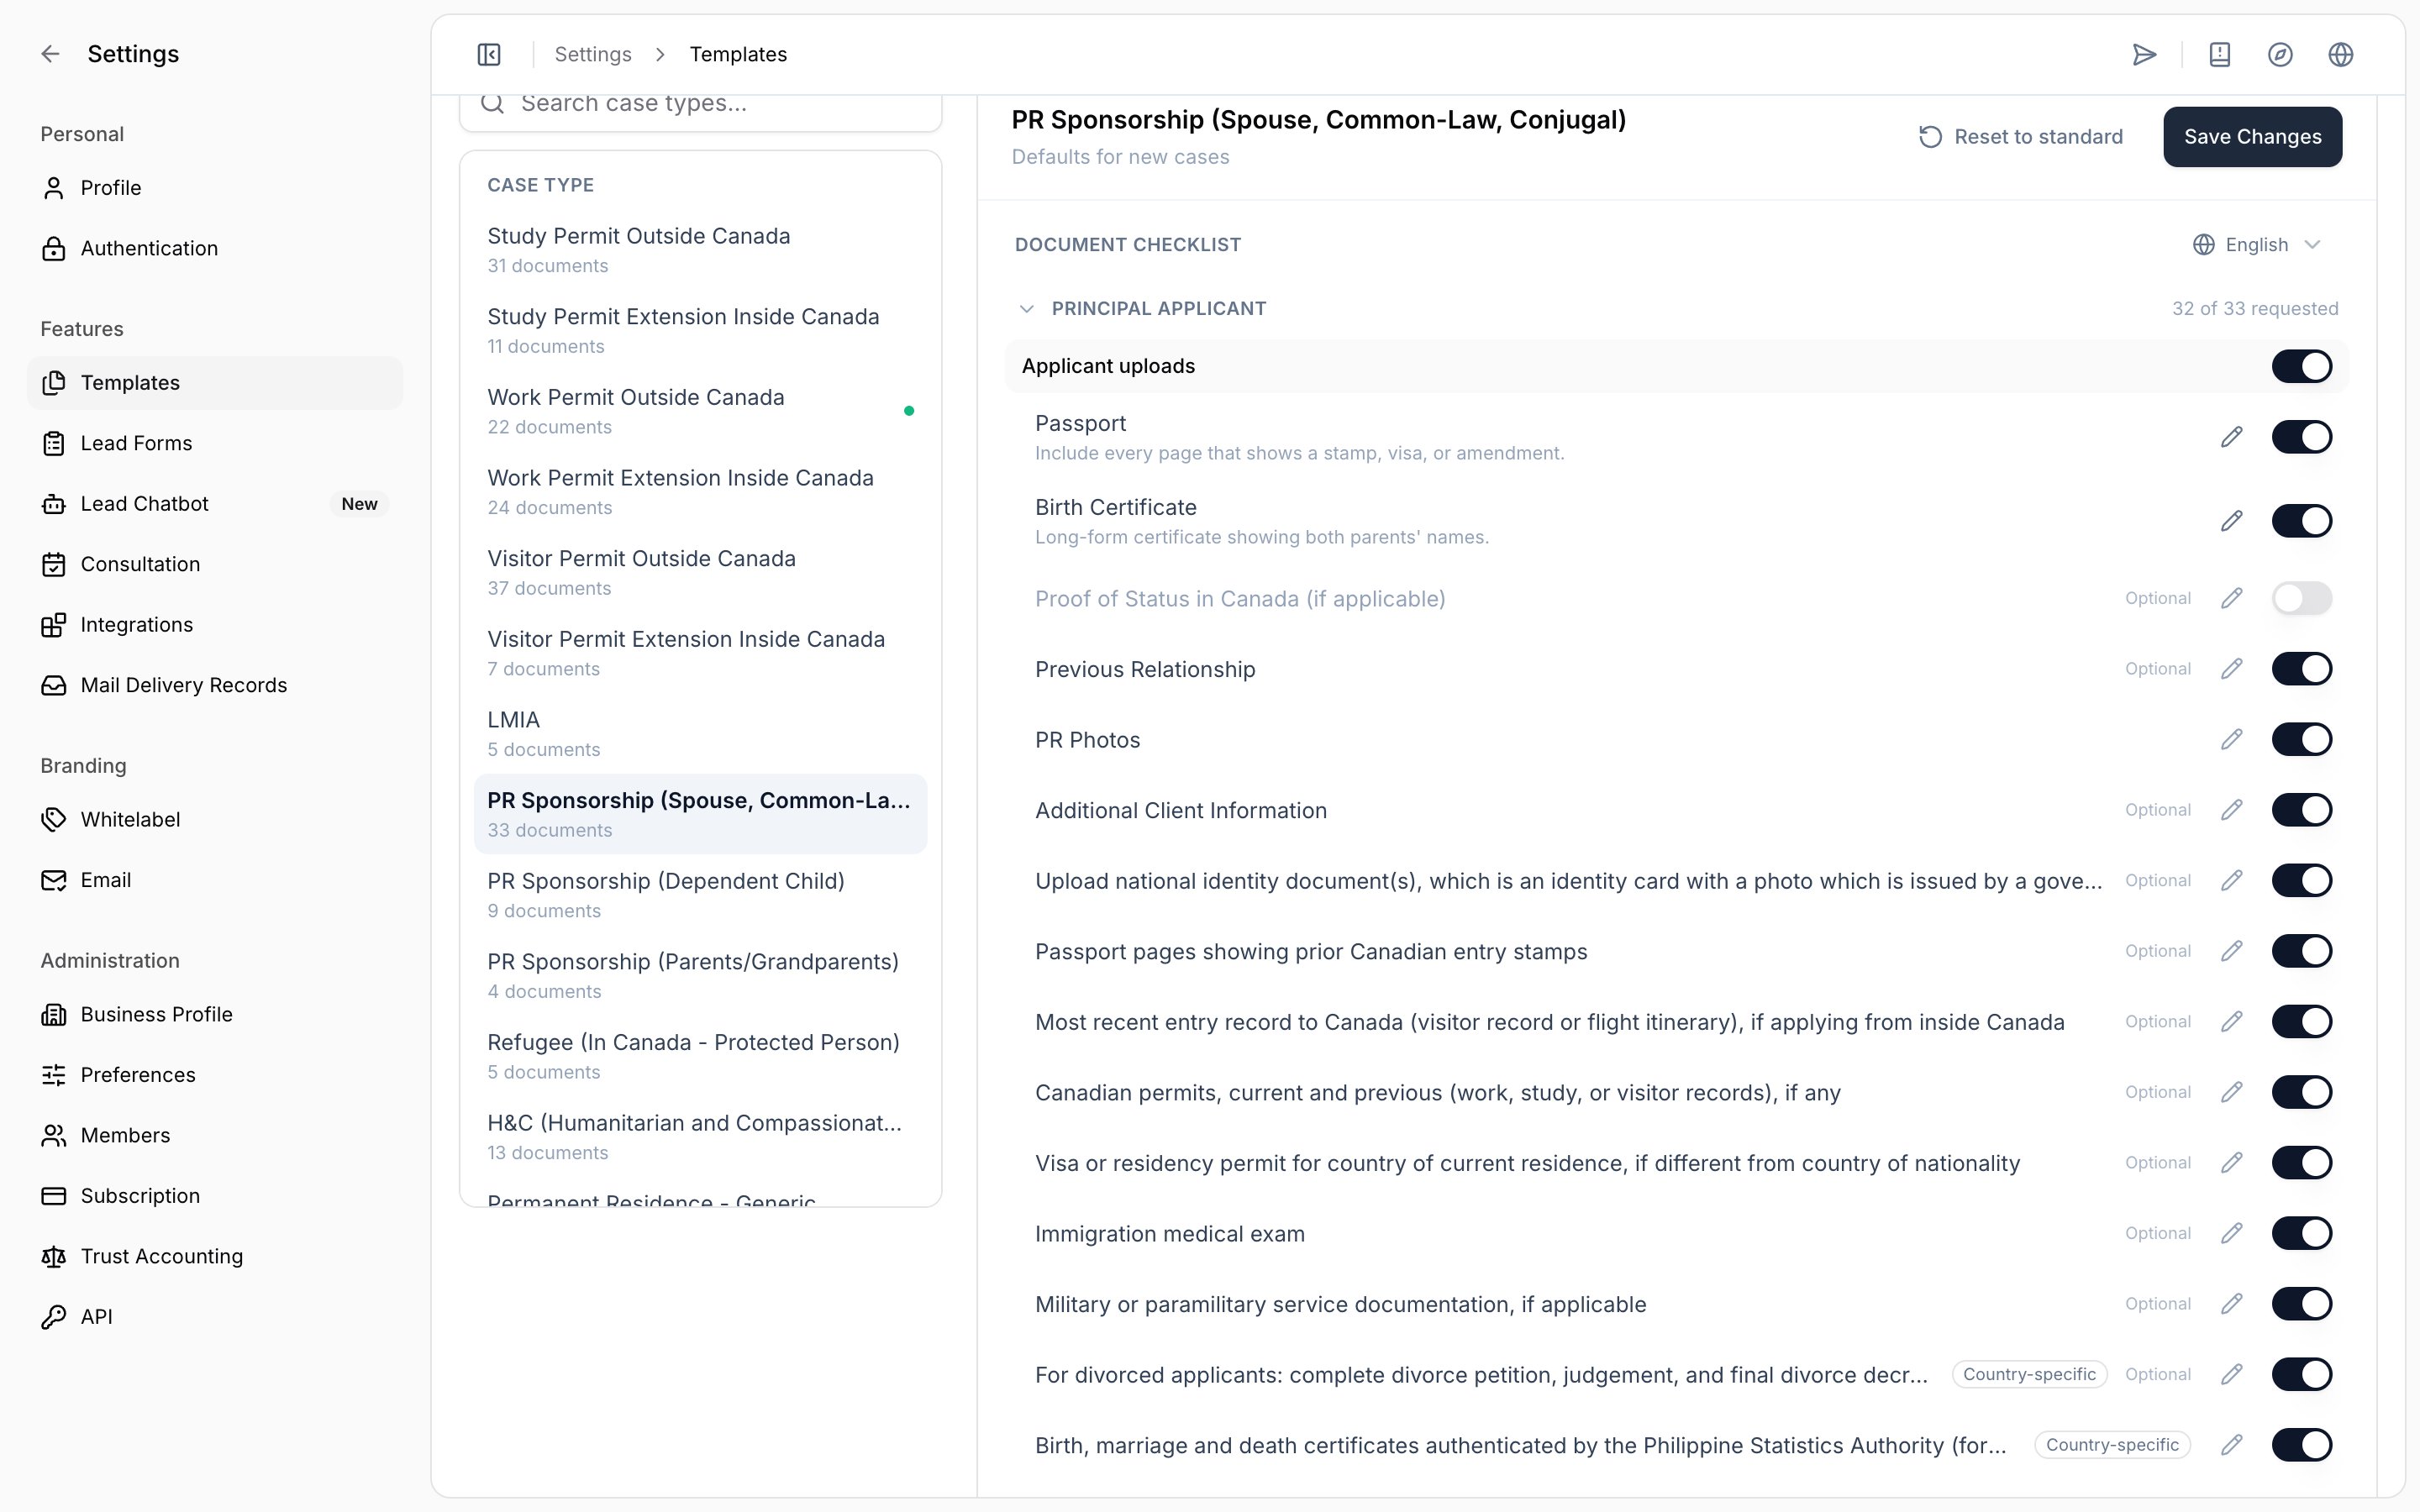 A document switched off, showing the updated count and the Save changes button
New cases of this type will show the document as **Not requested**, and it will not appear in the client's questionnaire. Existing cases are not changed.
Select **Reset to standard** to return the whole case type to VisaFlo's standard list. The reset is not applied until you select **Save changes**, so you can leave the page to discard it.
## Write your own client instructions
Standard documents come with generic examples. Replace them with the wording your firm uses.
1. Select the pencil icon on the document row.
2. Enter the instruction the client should read, then select **Save and Close**.
A document switched off, showing the updated count and the Save changes button
New cases of this type will show the document as **Not requested**, and it will not appear in the client's questionnaire. Existing cases are not changed.
Select **Reset to standard** to return the whole case type to VisaFlo's standard list. The reset is not applied until you select **Save changes**, so you can leave the page to discard it.
## Write your own client instructions
Standard documents come with generic examples. Replace them with the wording your firm uses.
1. Select the pencil icon on the document row.
2. Enter the instruction the client should read, then select **Save and Close**.
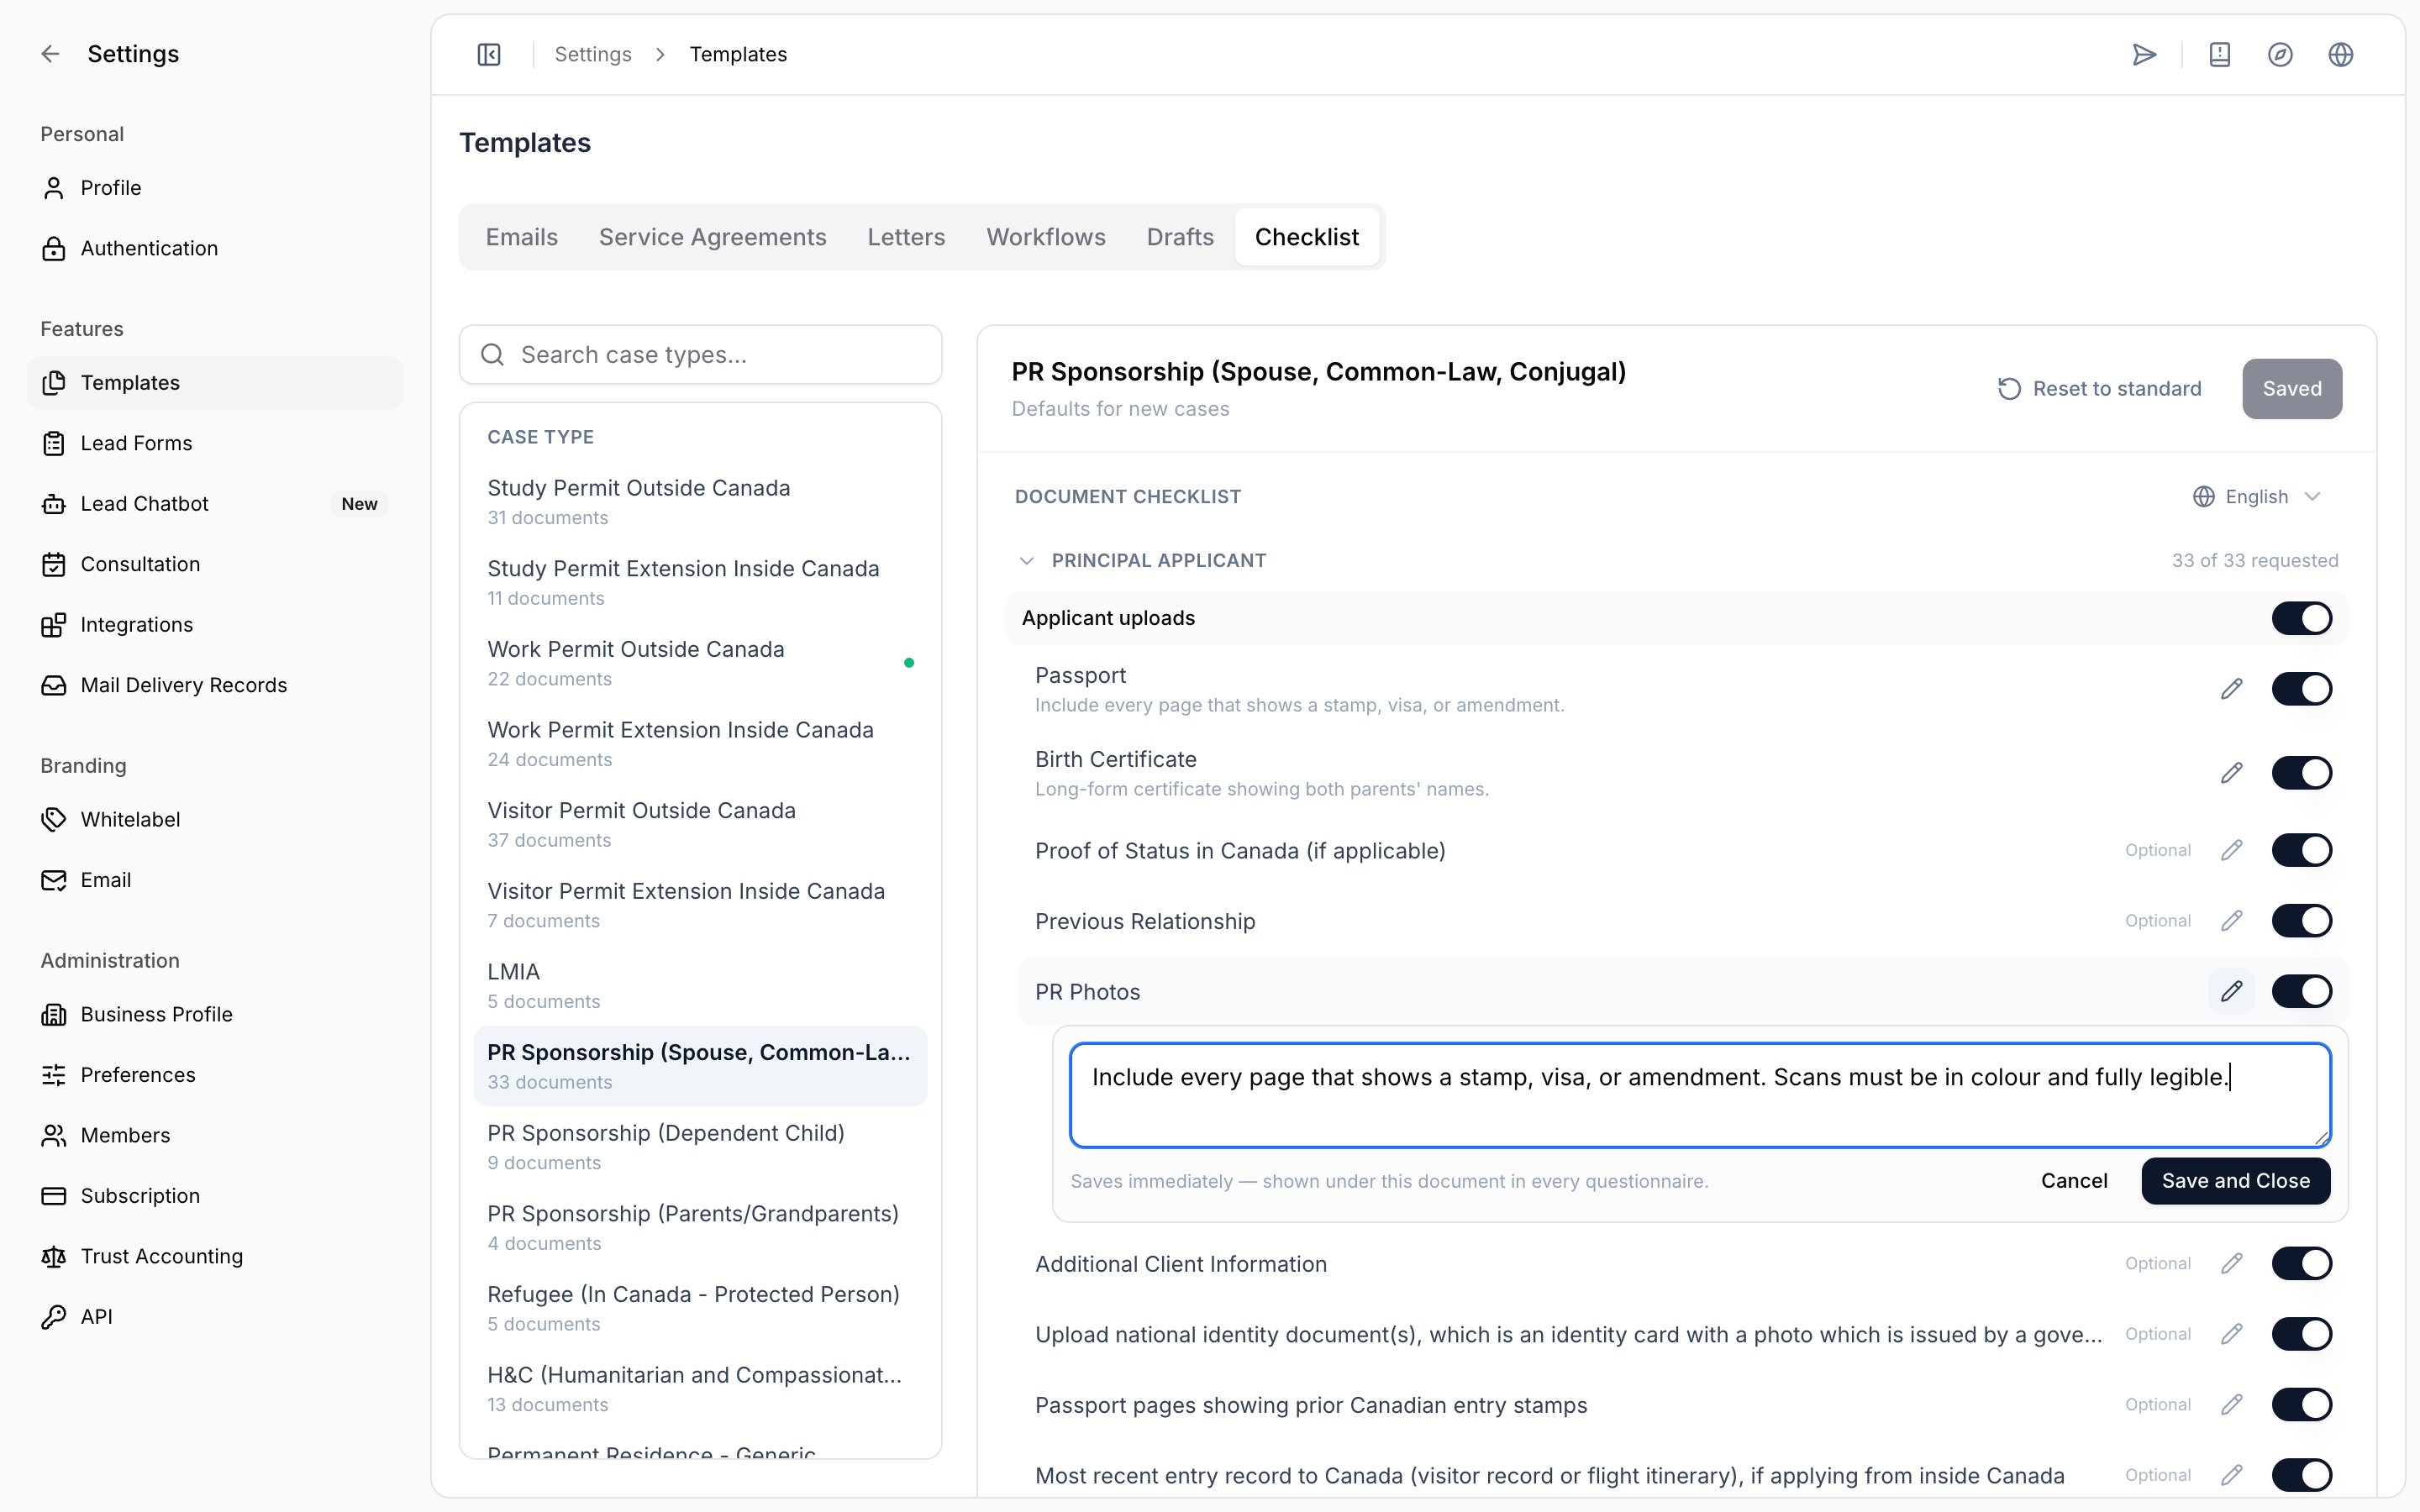 Inline editor for writing client instructions on a document
Instructions save immediately and replace the standard examples wherever that document appears. To restore the standard text, reopen the editor and select **Use standard**.
Keep instructions short and specific about what the file must show, for example which pages to include, whether colour scans are required, or how recent the document must be.
## Translate instructions
1. Use the language selector at the top of the document list.
2. Choose the language, then edit the document as usual.
Inline editor for writing client instructions on a document
Instructions save immediately and replace the standard examples wherever that document appears. To restore the standard text, reopen the editor and select **Use standard**.
Keep instructions short and specific about what the file must show, for example which pages to include, whether colour scans are required, or how recent the document must be.
## Translate instructions
1. Use the language selector at the top of the document list.
2. Choose the language, then edit the document as usual.
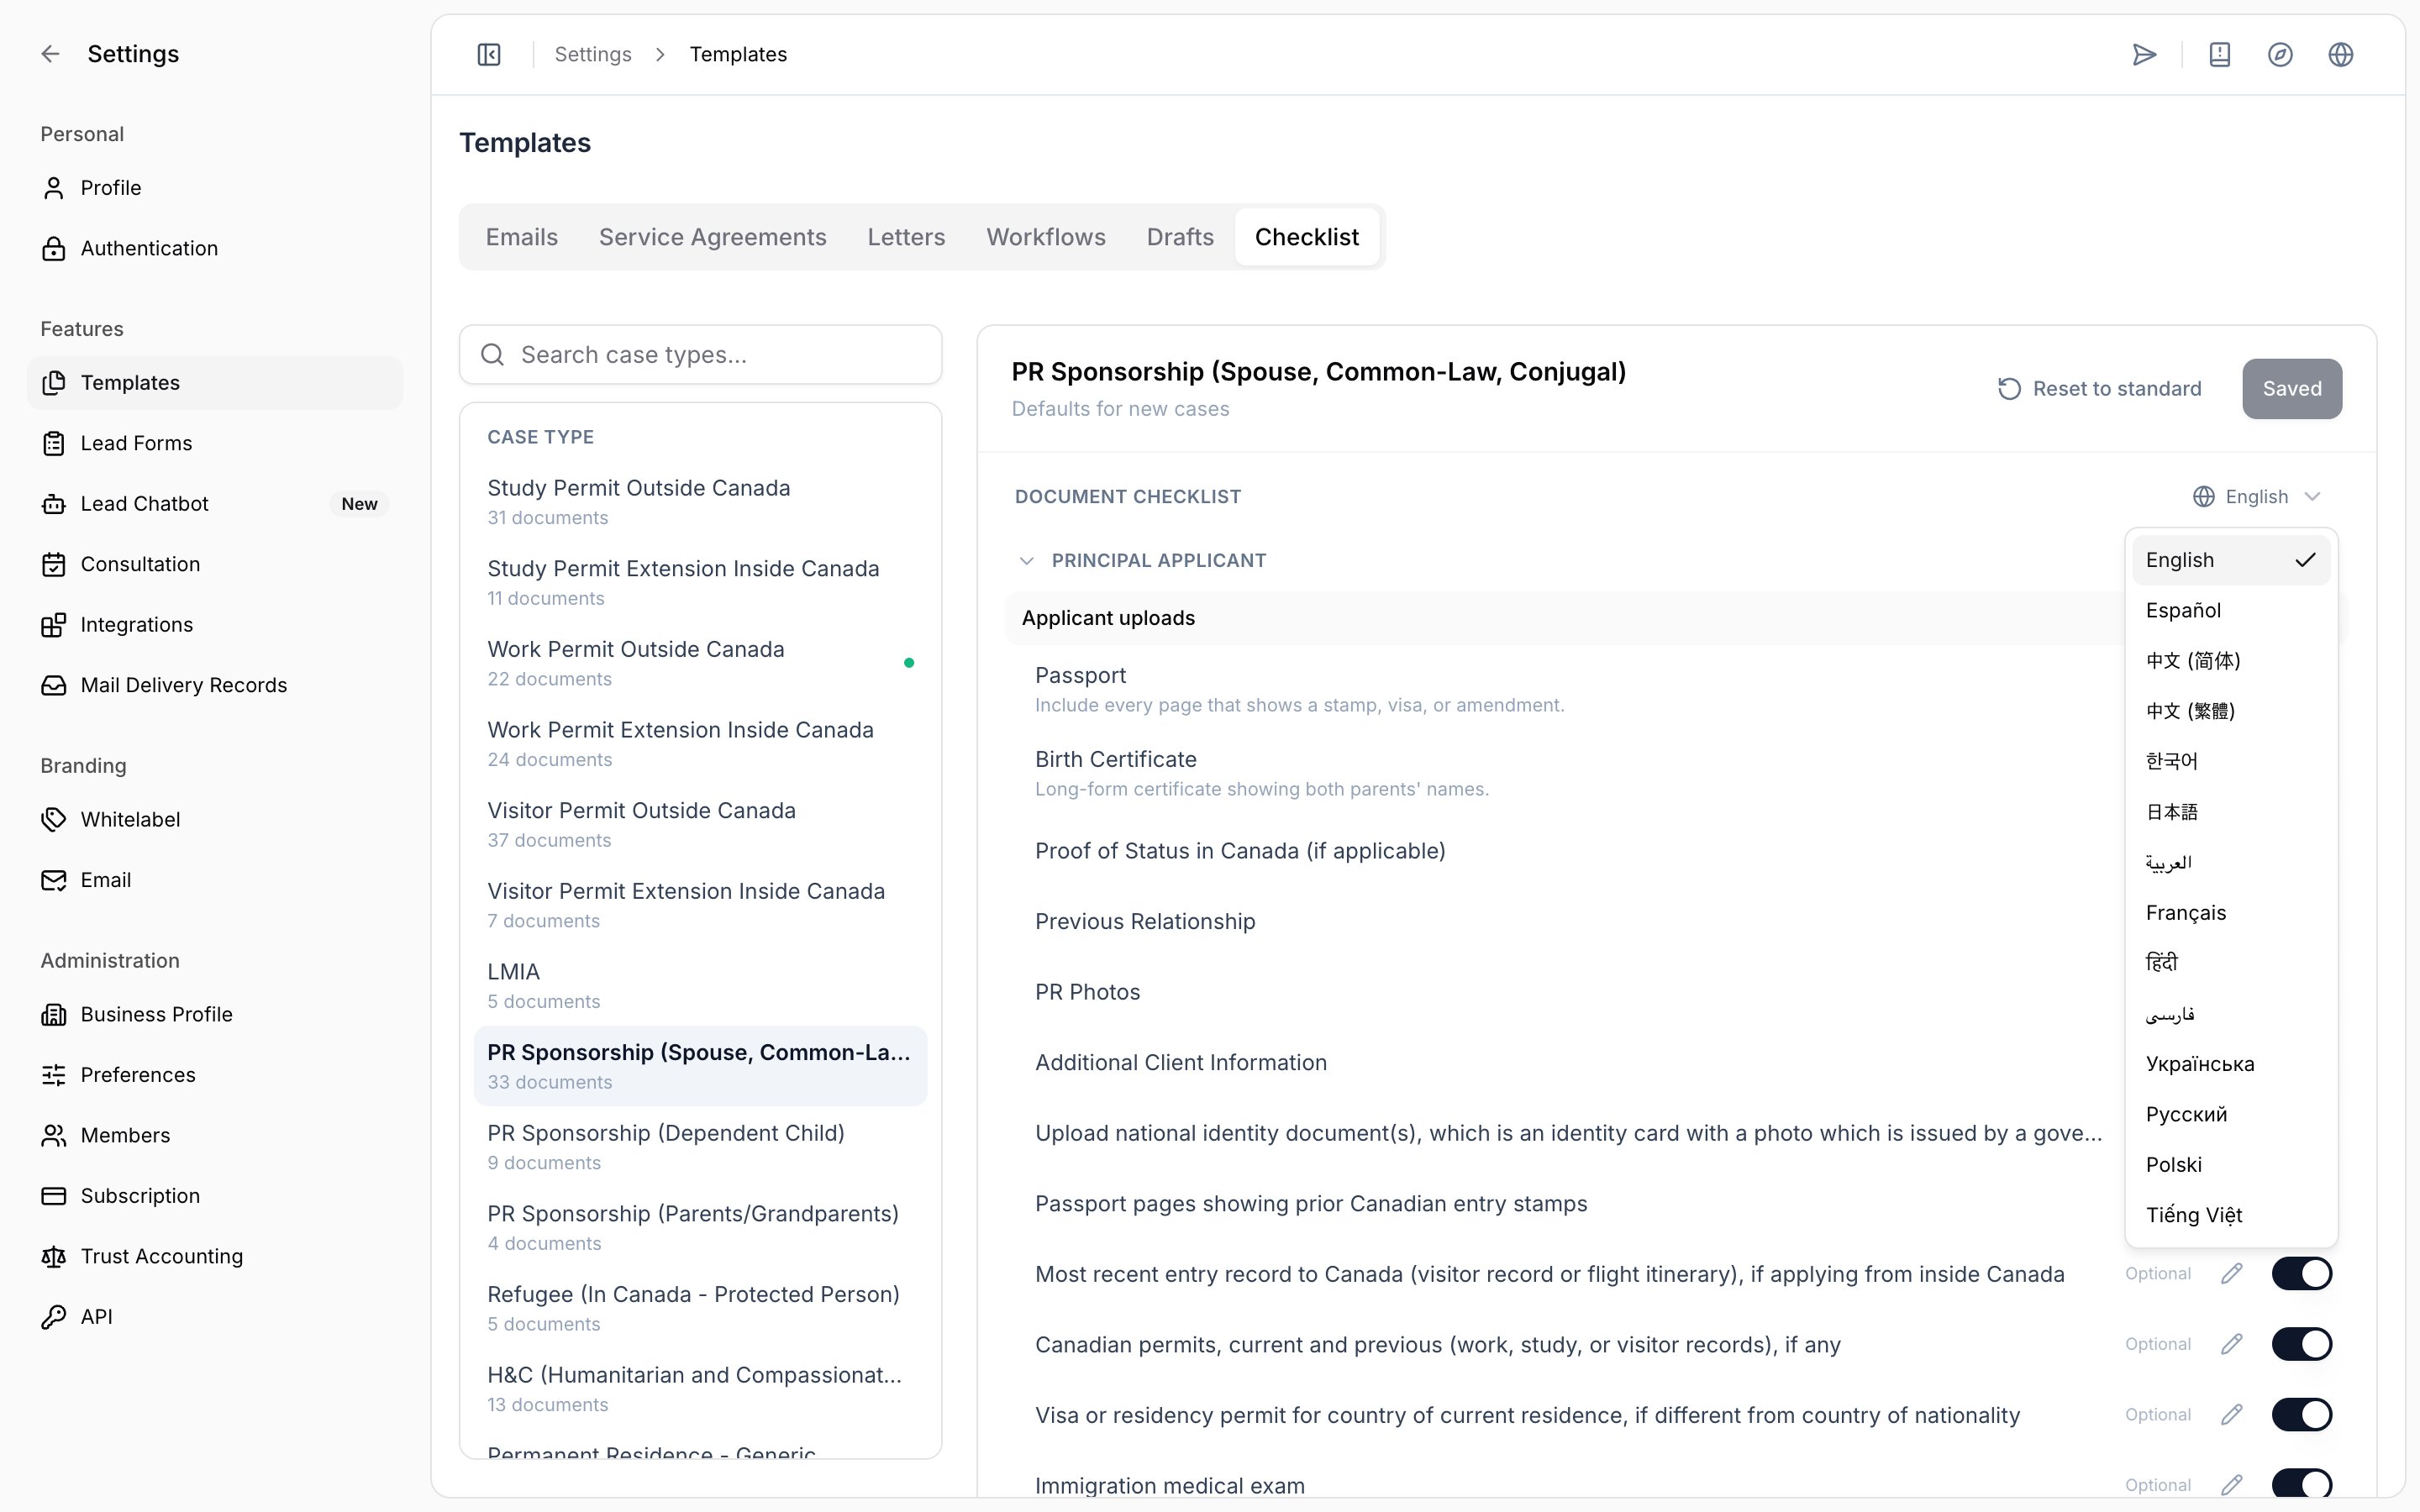 Instruction language selector showing languages in their native names
When you edit a translated instruction, the English version is shown above the editor for reference and the field starts empty, so a translation is never created by accident. Clients who view the questionnaire in a language you have not translated see the English instruction instead of no instruction at all.
Changing the language closes any open editor. Finish and save an instruction before switching languages.
## Add a document of your own
1. Scroll to **Custom documents** and select **Add your own document…**.
2. Enter the document title and, optionally, the instruction the client should read.
3. Select **Add document**, then **Save changes**.
Instruction language selector showing languages in their native names
When you edit a translated instruction, the English version is shown above the editor for reference and the field starts empty, so a translation is never created by accident. Clients who view the questionnaire in a language you have not translated see the English instruction instead of no instruction at all.
Changing the language closes any open editor. Finish and save an instruction before switching languages.
## Add a document of your own
1. Scroll to **Custom documents** and select **Add your own document…**.
2. Enter the document title and, optionally, the instruction the client should read.
3. Select **Add document**, then **Save changes**.
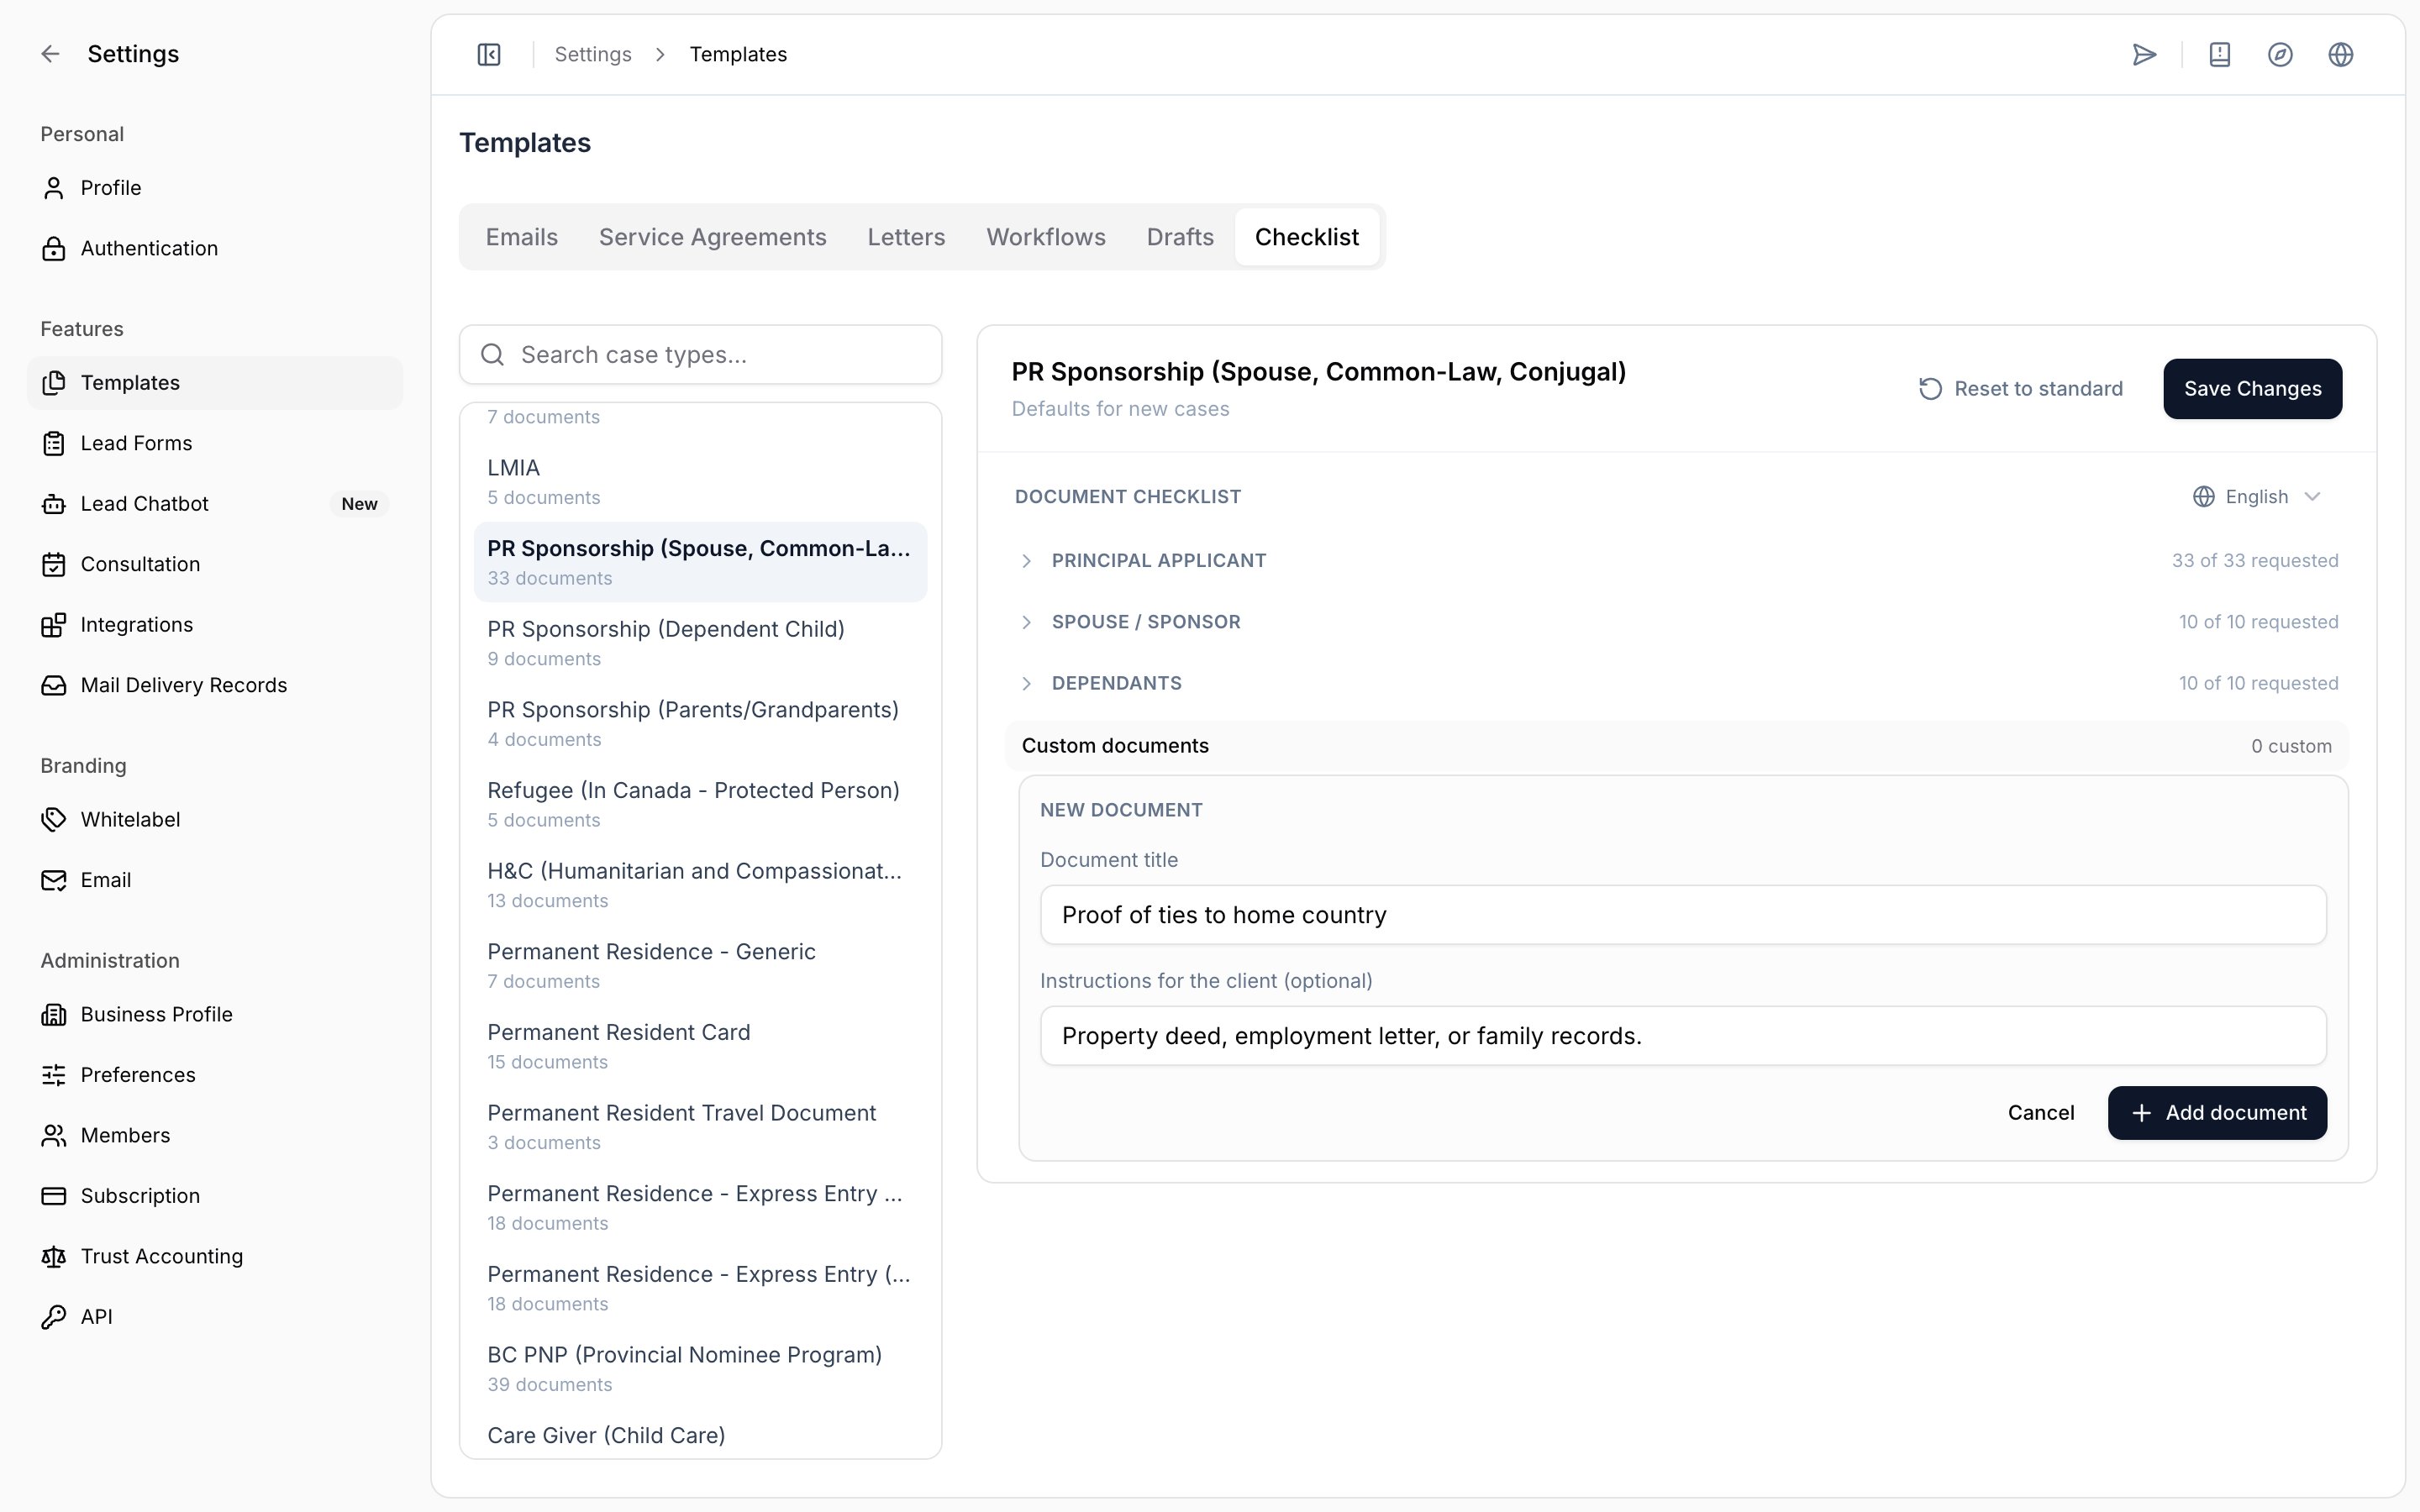 Form for adding a custom document with a title and client instructions
Custom documents appear alongside the standard list on new cases and are counted in the case type list as `· n custom`. Use the pencil and trash icons on the row to edit or remove one.
## Custom case types
If your firm saved a case as a custom case type, it appears under **Custom Case Type** and has its own checklist. Two things are worth knowing:
* Its document selection is copied from the case it was created from, including any documents that were switched off manually on that case.
* Client instructions are shared with every case type built on the same questionnaire, so editing an instruction here also changes it on the standard case type.
## Next steps
* Open a case of that type and confirm the checklist in the **Files** tab before inviting the client.
* Review the requested documents once more in the invitation, where you can still exclude a document for that client only.
* Continue with [Send Invitation](/knowledge-base/knowledge-base/questionnaires/send-invitation).
## Troubleshooting
**A change did not reach an existing case.** Document selection applies to new cases only. Adjust that case directly in its **Files** tab.
**An instruction changed on a case type you did not edit.** Instructions are shared by every case type built on the same questionnaire, including custom case types. Confirm which case types share that questionnaire before rewording an instruction.
**A country-specific document is not requested on a case.** These documents are only requested when the applicant's country matches the responsible visa office. They stay visible as **Not requested** so you can turn them on for that case if you need them.
**Save changes is still active after you edited an instruction.** Instructions save on their own and do not use the **Save changes** button. That button applies only to document selection and custom documents.
Form for adding a custom document with a title and client instructions
Custom documents appear alongside the standard list on new cases and are counted in the case type list as `· n custom`. Use the pencil and trash icons on the row to edit or remove one.
## Custom case types
If your firm saved a case as a custom case type, it appears under **Custom Case Type** and has its own checklist. Two things are worth knowing:
* Its document selection is copied from the case it was created from, including any documents that were switched off manually on that case.
* Client instructions are shared with every case type built on the same questionnaire, so editing an instruction here also changes it on the standard case type.
## Next steps
* Open a case of that type and confirm the checklist in the **Files** tab before inviting the client.
* Review the requested documents once more in the invitation, where you can still exclude a document for that client only.
* Continue with [Send Invitation](/knowledge-base/knowledge-base/questionnaires/send-invitation).
## Troubleshooting
**A change did not reach an existing case.** Document selection applies to new cases only. Adjust that case directly in its **Files** tab.
**An instruction changed on a case type you did not edit.** Instructions are shared by every case type built on the same questionnaire, including custom case types. Confirm which case types share that questionnaire before rewording an instruction.
**A country-specific document is not requested on a case.** These documents are only requested when the applicant's country matches the responsible visa office. They stay visible as **Not requested** so you can turn them on for that case if you need them.
**Save changes is still active after you edited an instruction.** Instructions save on their own and do not use the **Save changes** button. That button applies only to document selection and custom documents.